Hello there! Had a relaxing weekend brainstorming up some new drinks and projects 🙂 Now onto another week of wishing it was Friday….. I thought I would start the week by continuing my bloggy tutorials! My last tutorial was how to make a blog button, which you can see HERE.
This is a simple tutorial on how to upgrade your font to something new and exciting for FREE! I love to read blogs with different fonts…it adds to your blog’s theme and evens adds some voice to your writing!
If you haven’t already, find your way over to Typekit. This site has hundreds of fonts to choose from and it is very simple to upload them onto your blog! For most blogger purposes, this site allows FREE fonts (up to 2) for 1 website. The cost is displaying a tiny Typekit badge on the bottom of your blog (I think it’s about 10×10 pixels).
Step 1: Start by registering, after clicking the “Register” Button in the upper right hand corner of the site.
 Step 2: Next up, choose your fonts. You can choose up to 2 for free with the trial version of Typekit….so choose wisely! This step took me a few hours, but you can always change so don’t be too picky 🙂 Sooooo many fonts… After you choose the fonts you want, click “Add to Kit”.
Step 3: Now, you want to choose your Page Elements…ie which fonts you want where. First click “Launch Kit Editor” in the upper right hand corner. Then under “Page Elements” select your blog “theme” (ie wordpress theme). If your blog theme is not listed, you don’t have to choose one. Then choose which fonts you want for headings vs body.
Now time to link the fonts to your blog!
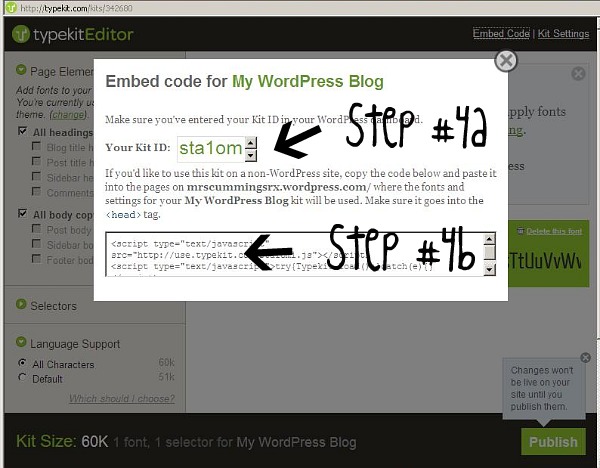
Step 4a (COMPATIBLE THEME): If you have a compatible blog theme, following along here. If not, move on to Step 4b. In the kit editor, click “Embed Code”. Copy the “Kit ID” and paste it into WordPress under Appearence >> Typekit Fonts >> Typekit ID.
Compatible WordPress Themes: Pilcrow, Contempt, Ambiru, Freshy, Coraline, Kubrick, Ocean Mist, Digg 3 Column, Black Letterhead, and Vigilance.
Step 4b (NON-COMPATIBLE THEME): If you have a non-compatible blog theme, following along here. In the kit editor, click “Embed Code”. Copy the code from the text box below “Kit ID” and paste into your <head> tag, which is found in WordPress blogs under Appearance >> Edit CSS >> CSS Stylesheet Editor. Just paste it into that huge text box with all the CSS Editing info.
The code should look something like this:
<script type=”text/javascript” src=”http://use.typekit.com/sta1omi.js”></script>
<script type=”text/javascript”>try{Typekit.load();}catch(e){}</script>
NOTE: You must have the WordPress CSS Upgrade to complete Step 4b. If you do not, you can purchase it or choose a Compatible WordPress Theme.
Step 5: Now for the final step….Publish! Click the “Publish” Button in the lower right hand corner of the Typekit Editor.
Now wait a minute or two for the info to be transferred via the magic of the internet and BAM you should have a smokin set of new fonts on your blog!!
Hope this info was helpful 🙂 Happy blogging!


Very cool tutorial. I’ll have to try this soon. The only thing I don’t love about my WordPress template is the font, so a custom font would make me really happy. 🙂
thanks! glad to help! think the custom fonts add alot….plus you can always change it!
Thanks for your comment, and thanks for this post! I had been wondering about the Typekits, whether or not they were useful. I appreciate your clarification. 🙂